Register a domain with Route 53
Route 53 is the AWS-service for registering and managing domains. For registering and moving domains into Route 53, AWS hands over the requests to the registrar Gandi, which is located in Paris, Luxembourg, San Francisco and Taipei. The actual content of a domain is managed within Route 53, if the nameserver-entries for the domain point to specific AWS-nameservers.
To be honest, other hosters or ISPs also do that, too. However, in this blog-post I will show you, why Route 53 is not just only registering and managing domains like at any other hoster.
Pricing
Registering a domain within Route 53 is quite affordable compared to other providers. In the USA, the registrar GoDaddy is one of the big players. In Germany, I would chose United Domains, as they - same as Route 53 - offer a big range of available TLDs. Therefore, I compared the three of them concerning their prices in USD per year for one domain and availability of TLDs.
| TLD | AWS | GoDaddy | United Domains |
|---|---|---|---|
| .com | $12 | $13 | $17 |
| .net | $10 | $10 | $17 |
| .org | $12 | $8 | $17 |
| .de | $9 | $10 | $6 |
| .cl | $93 | $70 | $165 |
| .io | $39 | $59 | $110 |
| Provider | No. of TLDs |
|---|---|
| AWS | 156 |
| GoDaddy | 352 |
| United Domains | 635 |
Registration Process
Same as for many other tasks with AWS, the registration can be done via the Management Console, as well as aws-cli. In the post, I will focus on the command line part.
First, you need to check, if the new domain is still available. This can be done with following command.
$ aws route53domains check-domain-availability --domain-name aws-blog.io --region us-east-1
UNAVAILABLE
If you get the error message Could not connect to the endpoint URL: “https://route53domains.eu-central-1.amazonaws.com/”, it could be that your configured default region has no support for the needed services. In order to use this service, you need to set your default region to e.g. us-east-1, create a new aws-cli profile explicitly for us-east-1 or just append –region us-east-1 to your command.
As we can see, the domain aws-blog.io as expected is already taken. So you can try for another domain and the output would look like this.
$ aws route53domains check-domain-availability --domain-name perhaps-this-domain-is-available.com --region us-east-1
AVAILABLE
Now that we have found a free domain-name, we can start registering it. We first create a cli-skeleton for the parameters.
$ aws route53domains register-domain --generate-cli-skeleton >> registration.jsonAfter the export of the sekeleton-code, we can update the parameters accordingly. When the editing is done, we can run the registration command.
$ aws route53domains register-domain --region us-east-1 --cli-input-json '{
>     "DomainName": "aws-is-cool.de",
>     "DurationInYears": 1,
>     "AutoRenew": false,
>     "AdminContact": {
>         "FirstName": "XXX",
>         "LastName": "XXX",
>         "ContactType": "PERSON",
>         "AddressLine1": "XXX",
>         "City": "XXX",
>         "CountryCode": "DE",
>         "ZipCode": "XXX",
>         "PhoneNumber": "+49.178000000",
>         "Email": "XXX"
>     },
>     "RegistrantContact": {
>         "FirstName": "XXX",
>         "LastName": "XXX",
>         "ContactType": "PERSON",
>         "AddressLine1": "XXX",
>         "City": "XXX",
>         "CountryCode": "DE",
>         "ZipCode": "XXX",
>         "PhoneNumber": "XXX",
>         "Email": "XXX"
>     },
>     "TechContact": {
>         "FirstName": "XXX",
>         "LastName": "XXX",
>         "ContactType": "PERSON",
>         "AddressLine1": "XXX",
>         "City": "XXX",
>         "CountryCode": "DE",
>         "ZipCode": "XXX",
>         "PhoneNumber": "XXX",
>         "Email": "XXX"
>     },
>     "PrivacyProtectAdminContact": true,
>     "PrivacyProtectRegistrantContact": true,
>     "PrivacyProtectTechContact": true
> }
> '
24bXXX78-XXXX-4c68-XXXX-276XXXd645f1
As the return code of the command, we get an opration id. We can now check the status of our registration process, as this may take some time.
$ aws route53domains get-operation-detail --region us-east-1 --operation-id 24bXXX78-XXXX-4c68-XXXX-276XXXd645f1
aws-is-cool.de	24bXXX78-XXXX-4c68-XXXX-276XXXd645f1	IN_PROGRESS	1432XXXX133.5REGISTER_DOMAIN
After the domain had been successfully registered, the response now looks like the following.
$ aws route53domains get-operation-detail --region us-east-1 --operation-id 24bXXX78-XXXX-4c68-XXXX-276XXXd645f1
aws-is-cool.de	24bXXX78-XXXX-4c68-XXXX-276XXXd645f1	SUCCESSFUL	1432XXXX133.5	REGISTER_DOMAIN
Management of Domains
The management of the domains within Route 53 can be done with plain aws-cli. However, there’s another cli which sits on top of aws-cli for handling Route 53 in an easier way. That cli is called cli53. The installation can be done via pip.
$ sudo pip install cli53With cli53 being installed, we can now create the first recordset in the hosted zone of our domain. The following command for example creates a mapping of www.aws-is-cool.de to 176.32.98.166.
$ cli53 rrcreate aws-is-cool.de www A 176.32.98.166 --ttl 3600
Success
ChangeInfo:
  Status: PENDING
  SubmittedAt: 2015-05-20T21:11:14.540Z
  Id: /change/C3CGXXXXX6YPT9
In order to delete the created recordset again, you just need to run the next command.
$ cli53 rrdelete aws-is-cool.de www A
Deleting www A...
Success
ChangeInfo:
  Status: PENDING
  SubmittedAt: 2015-05-20T21:19:08.040Z
  Id: /change/C1ODXXXXXSY07
Backup the DNS-config
A backup of all recordset of a domain can be very usefull, in case anything goes wrong. With cli53 you can easily export a domain in bind-format and afterwards import it again.
export single domain
$ cli53 export --full aws-is-cool.de >> aws-is-cool.de.bindexport all domains
$ for domain in $(cli53 list | grep Name: | awk '/ / { print $2 }' | sed s'/.$//')
do
  cli53 export --full $domain >> $domain.bind
done
import single domain
$ cli53 import aws-is-cool.de --file aws-is-cool.de.bind --replace --waitWith the above code, a less risky way of domain-import is being done. If you don’t want to, you can also leave out –replace –wait from the command.
Alias Entries
In order to explain the concept of alias-entries I took the following architecture.
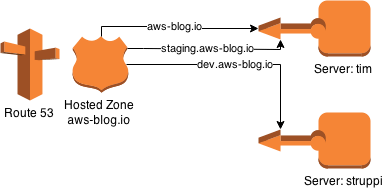
The steps for creating the recordsets for the concept are
- find the ID of the Hosted Zone.
- create entry for tim.aws-blog.io to 10.0.0.1
- create entry for struppi.aws-blog.io to 10.0.0.2
- create alias entry for aws-blog.io to tim.aws-blog.io
- create alias entry for staging.aws-blog.io to tim.aws-blog.io
- create alias entry for dev.aws-blog.io to struppi.aws-blog.io
Thanks to cli53, this can be done with the following few commands.
$ cli53 info aws-blog.io
HostedZone:
  ResourceRecordSetCount: 5
  CallerReference: RISWorkflow-235edf15923f0XXXXXc26ddbeea39ee2
  Config:
    Comment: HostedZone created by Route53 Registrar
    PrivateZone: false
  Id: /hostedzone/Z3GXXXXX3UGTO
  Name: aws-blog.io.
DelegationSet:
  NameServers:
    - ns-806.awsdns-36.net
    - ns-500.awsdns-62.com
    - ns-1176.awsdns-19.org
    - ns-1617.awsdns-10.co.uk

$ cli53 rrcreate aws-blog.io tim A 10.0.0.1
$ cli53 rrcreate aws-blog.io struppi A 10.0.0.2
$ cli53 rrcreate aws-blog.io dev ALIAS 'Z3GXXXXX3UGTO struppi.aws-blog.io'
$ cli53 rrcreate aws-blog.io staging ALIAS 'Z3GXXXXX3UGTO tim.aws-blog.io'
$ cli53 rrcreate aws-blog.io '' ALIAS 'Z3GXXXXX3UGTO tim.aws-blog.io'
The nice thing of this concept is that whenever tim or struppi need to change their IP-address, they don’t need to get changed for all referencing entries, but only for the non-alias entry.